

Better Homes & Gardens 1 Knob Curtain Rod 42 120
Let's talk Curtain Rods. More specifically, let's talk about how to make a DIY curtain rod.
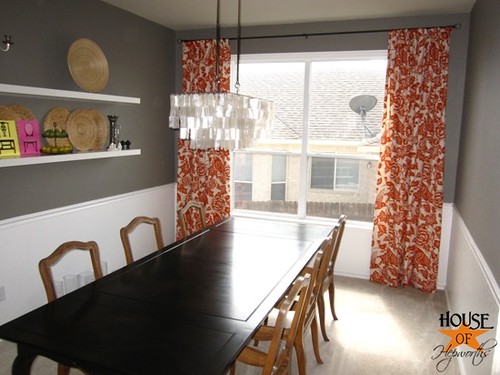
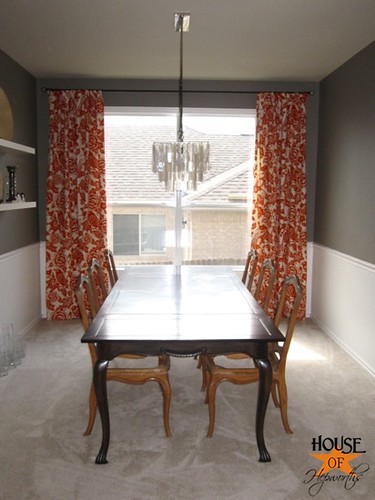
Before I begin, thank you so much for being so kind about my new curtains in the dining room! I am taken aback daily by how many genuinely nice people there are in this blogging community. Thank you for loving the curtains along with me, and also thank you for just being plain ol' nice.
Now, shall we get down to business?

I should dedicate an entire post just to curtain rods, because after this experience, I think I know every single option of inexpensive curtain rod options in the greater Austin area. That post is for another day though. Let me just say that the cheapest options I found were Wal-Mart and IKEA. But my DIY curtain rod version is significantly cheaper than both of those.
How to make a DIY Curtain Rod:
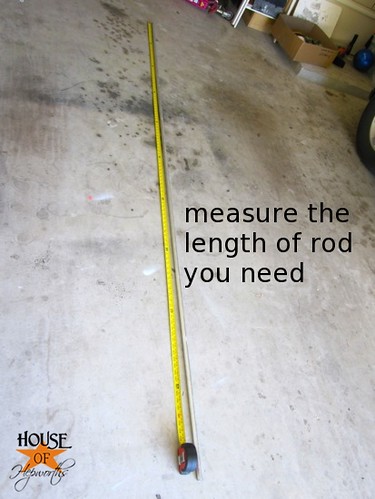
I headed to our local hardware store on a mission to find a practical inexpensive solution to my curtain rod dilemma. Part of my problem is that I needed a VERY LONG curtain rod; 113 inches to be exact. You can't exactly buy rods that are almost 10 feet long at Wal-Mart. Trust me, I tried. 🙂
At our local hardware store I found a variety of objects that could work, but in the end the heavens parted and I stumbled on Electrical Conduit.
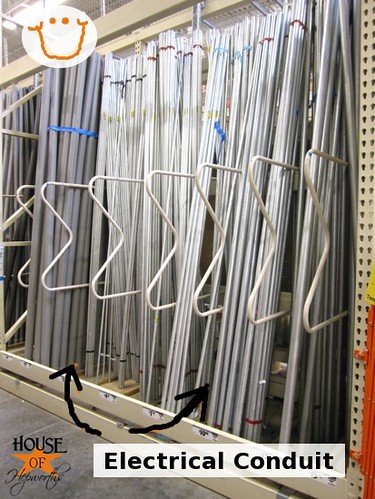
Bless the person that invented this light weight, sturdy, and extremely inexpensive product!
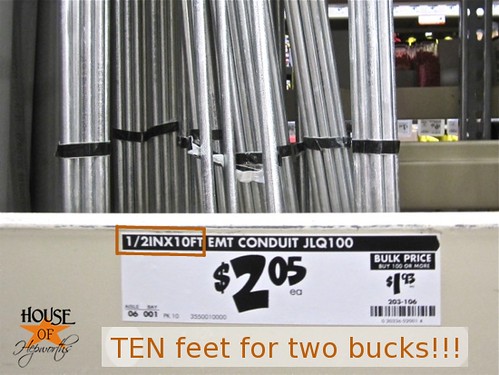
It was exactly what I was looking for; 10 feet long, light weight, metal, and the best part, only TWO DOLLARS.
But let me back up for a sec. I first considered PVC pipe. I've seen it done before, but I was worried that the weight of the curtains would eventually make the PVC bow or sag. Also, PVC is plastic which would require an additional step to paint. I considered buying a wooden dowel rod, but scratched that plan because I just didn't like it. I also strongly considered plumbing pipe, which I almost bought before stumbling upon the Electrical Conduit. The plumbing pipe was very heavy though and was significantly more expensive.
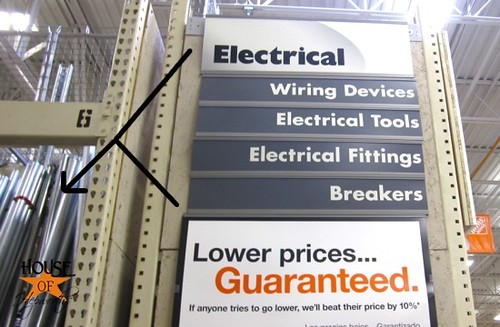
In the end, in my humble opinion, if you need a custom DIY curtain rod, Conduit is 100% the route you should go if you don't want to spend fifty bucks. It can be found on this isle:
I bought the conduit that was 1/2″ x 10′.
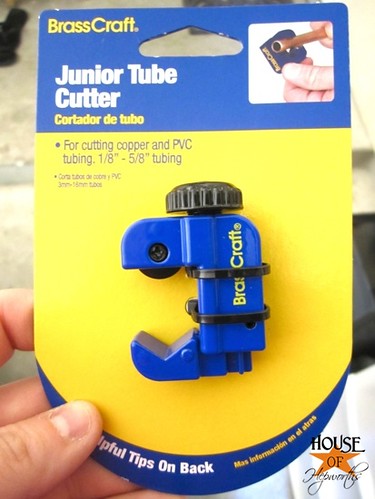
To cut conduit to size you'll need a pipe cutter. I bought the absolute cheapest one I could find. It was $6, and worked about as well as you'd expect a $6 pipe cutter to work. The job got done though, and I'm not complaining!
To create a custom DIY curtain rod you'll need to figure out how long to cut the rod. Don't forget to keep in mind the width of each of the finials sticking out on either side as well. My rod needed to be 113″.
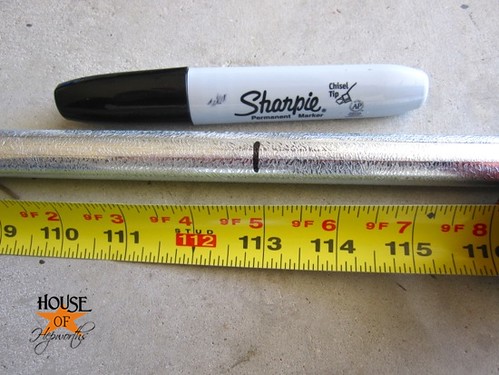
I just measured the pipe and marked where I needed to cut with a Sharpie.
Now just attach your pipe cutter and follow the directions on the back. Basically rotate it around the pipe one full rotation, then tighten the knob. Do another rotation. Tighten. Repeat until the pipe snaps in half.
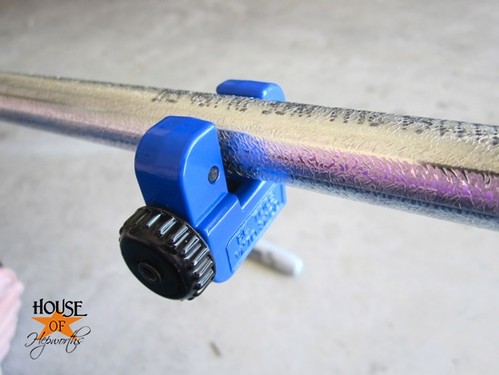
I ended up using pliers to tighten the knob each time and vice grips to hold the tubing while I forced the cutter around the pipe.
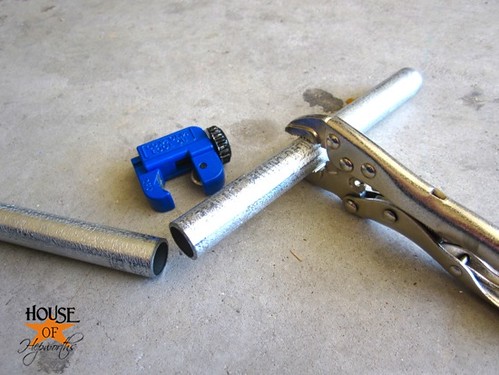
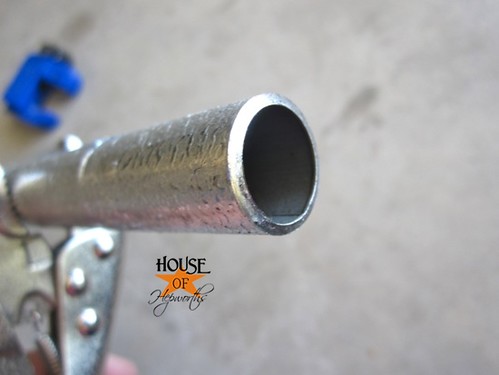
The pipe cutter made a very smooth cut. I was actually impressed that the edge of the pipe wasn't sharp at all. Double bonus for not slicing my finger on the end of a sharp pipe!
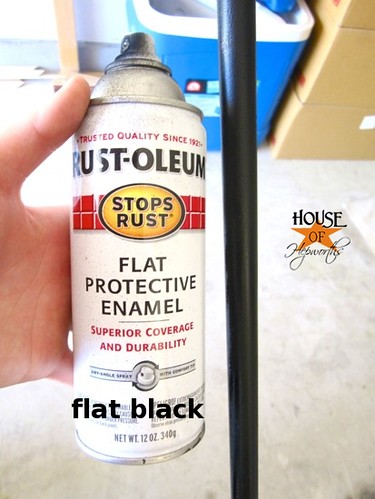
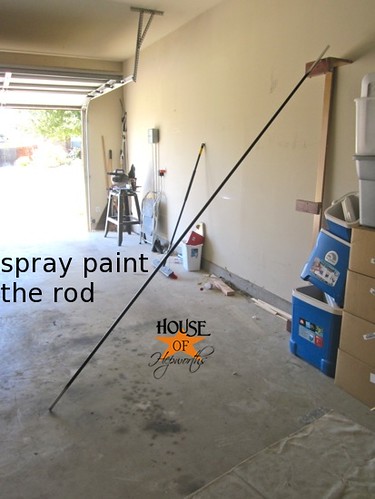
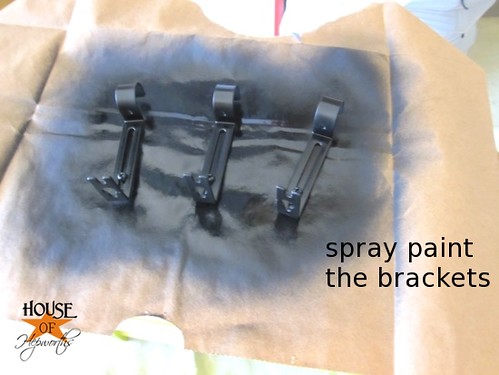
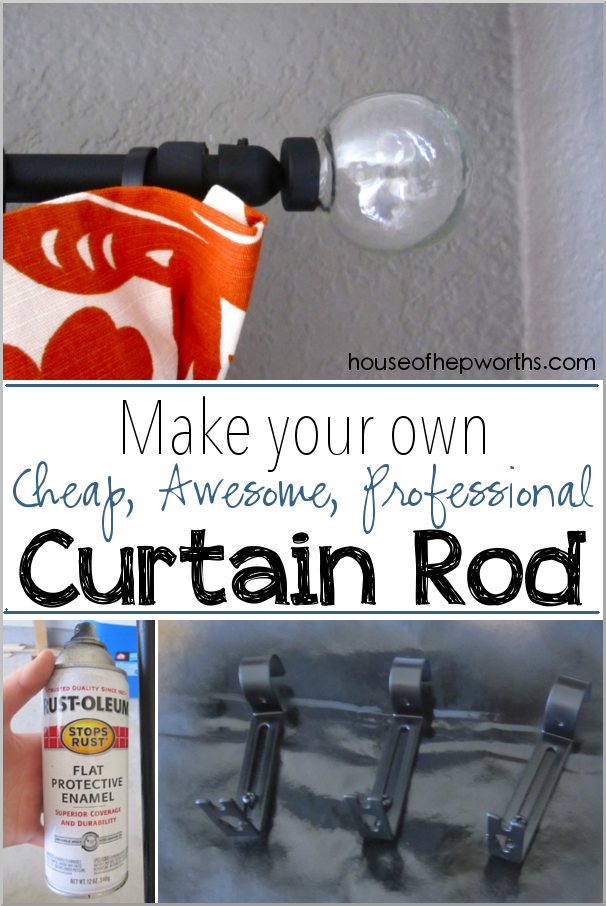
Once the pipe was cut to length I just propped it up in the garage and spray painted it, as well as all the DIY curtain rod hardware. I considered my favorite color, Oil Rubbed Bronze, but I decided on flat black so that my curtains would be the focal point, not the rod itself.
I like to spray paint IN the garage so that no debris blows into my object and sticks to it. I just propped the pipe up against the leftover feet from my sofa table project.
I already had the brackets for the rod (I'm a hoarder… lol) so I just spray painted them black as well. I'm pretty sure you can buy just brackets at most stores, and if not, I see them at goodwill for super cheap all the time.
I also dug out some anchors and screws from my screw and nail stash, stuck them into a used-up sanding block, and gave them a good coat of spray paint as well.

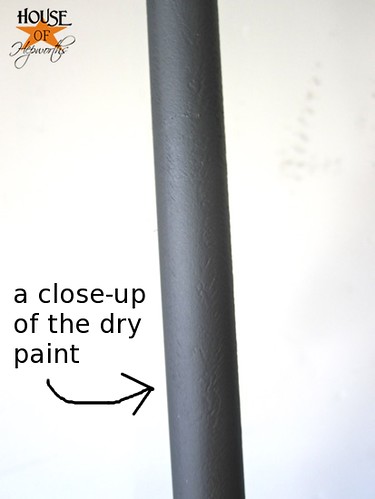
Here's a good close-up shot of the rod once it was dry. I didn't prime any of this stuff before I painted, but after doing this project, I recommend you prime your conduit with automotive primer (it's for metal) so that no paint scratches off.
Once everything was dry I installed it and then got to work on hanging the curtain.
Curtain Rings and Finials:
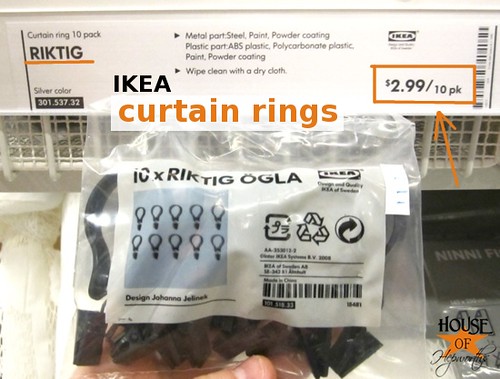
I found these curtain rings at ikea for only $2.99 for 10 of them, which is the best price I found anywhere. The next cheapest option was Wal-Mart. Their rings were $7.99 for a 7-pack, but they were metal, not plastic.
If you are going to have your rings show, I'd go with the nicer ones that are metal (or wood if you are going that route), but my clips were going to be hidden, so the plastic ones were great.
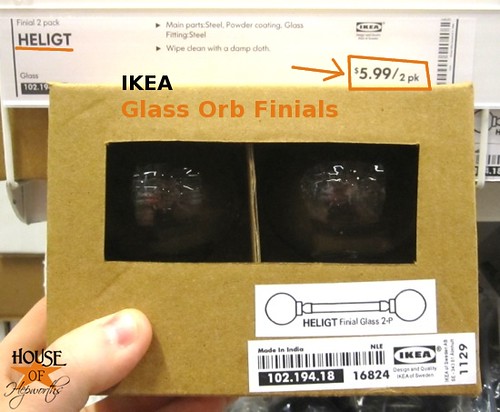
Also, I totally scored on finials at ikea. I've never seen finials there before, so I guess they are a brand-new product. They have two options, a solid metal curvy one, or clear glass orb ones. I chose the clear glass ones. Both options are only $5.99 for the 2-pack. The next closest thing I found was at our local hardware store for basic round unfinished wood ones (ugly) for $10 for a 2-pack.
Attaching the Curtain Rings:
I originally saw this idea over at Thrifty Decor Chick, but I can't find the specific post. So anyway, this was her idea, I just copied it.
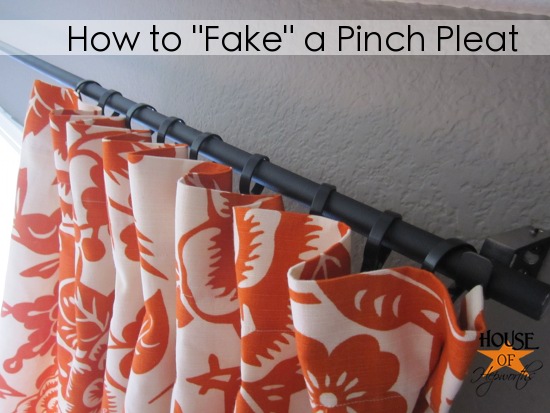
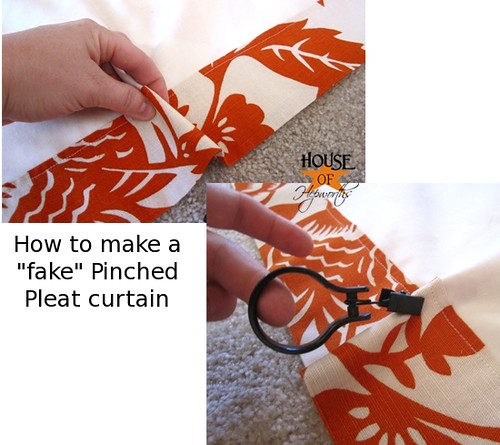
I want Pinch Pleat Curtains for my dining room, but they seem like a whole lot of hassle to make them, so I just "faux" made them. So easy! Here's the final look, and then I'll show you how I did it.
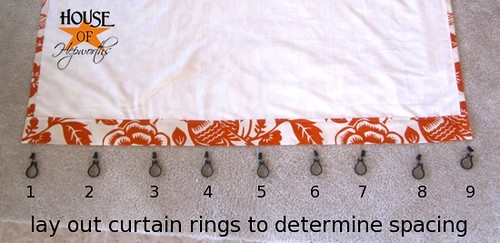
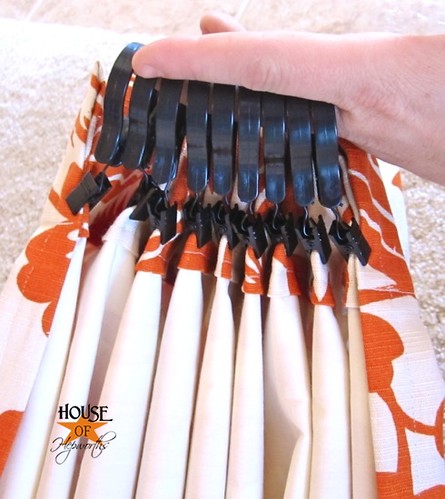
First, lay out your curtain flat on the ground and lay the rings under (above?) it. You want to make sure you get the spacing even. I eye-balled this step. You don't need to be totally precise here.
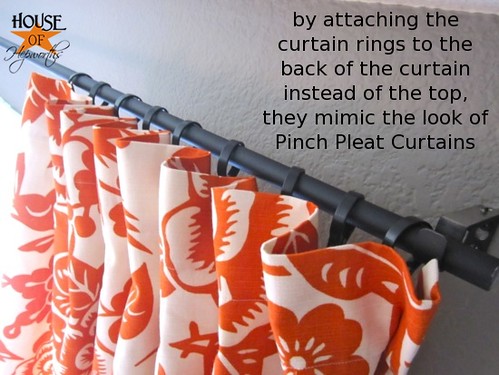
When you attach the clips you are going to clip them on the back of the curtain, not the top edge. This creates the pleat look.
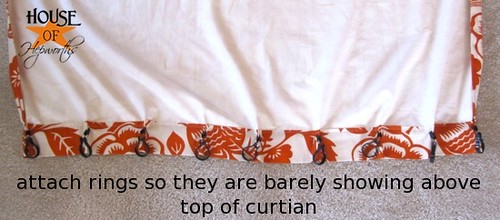
To attach the rings, pinch the section of curtain you want the ring to be attached to, then just clip the ring right onto the pinched fabric. Make sure you set your rings low enough that they will barely show over the top of your curtain.

That's it. It's so easy. Now just gather them all up and slide them onto your rod that you've already set on top of your brackets.
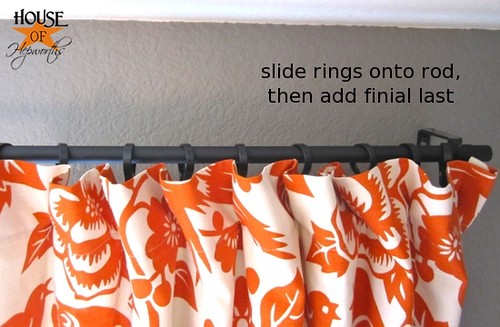
You are almost done! All you need to do now is add your finials on either end. Because I used Conduit and not real curtain rod, the conduit was just slightly too small for the finials. It was really no big deal. I just grabbed some black electrical tape (I used this solely because it was black, not because it was electrical) and wrapped it around the tip of the pipe.
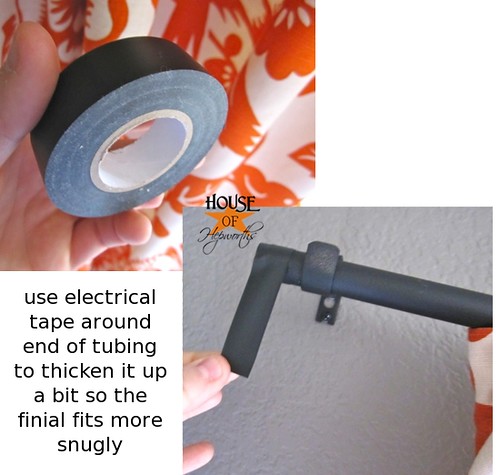
From there, slide your finials on, tighten them down with a tiny screwdriver, and you are done!

I know I showed you a lot of steps, but trust me, this was an easy project. It did take some time, but the amount of money I saved was so worth it. Here's the cost break-down for ya:
Electrical Conduit: $2
Finials (2-pack): $6
Brackets and screws: FREE
Grand Total for the entire DIY Curtain Rod: $8
EIGHT DOLLARS!!!!
Trust me when I say to purchase a 10′ curtain rod could cost you anywhere from $40 – $80, if not more! I saved boo-koos of moola here.
So there you go. A complete step-by-step tutorial on how to make your own $8 DIY Curtain Rod.
* I want to add that you can purchase expandable rods that pull out to about 10 feet, but I personally hate extendable curtain rods. They leave a seam down the middle of your rod where the two ends meet, and I don't like that at all! I want my DIY curtain rod to be one solid piece without any seams across it. This is why it was such an ordeal for me to find a 10′ rod. You can't really buy rods that long at very many places, so they are very expensive.
I hope I was able to give you some useful tips that you can use in your own home!
Check out these other curtain-related posts:
- My dining room curtains are done! (Thomas Paul Aviary Fabric)
- How to make Professional, Lined Curtain Panels
- How to make cheap, sophisticated window treatments
- How to turn bed sheets into curtains
- Using an IKEA kitchen rail as a curtain rod
- Adorable tween girl polka-dot pom pom curtains tutorial

Instagram || Facebook || Pinterest || Youtube
This post contains amazon affiliate links
Thanks for reading! Have a wonderful week!
Better Homes & Gardens 1 Knob Curtain Rod 42 120
Source: https://www.houseofhepworths.com/2011/10/11/how-to-make-a-cheap-awesome-professional-curtain-rod/
Posted by: mclachlanlaze1999.blogspot.com
0 Response to "Better Homes & Gardens 1 Knob Curtain Rod 42 120"
Post a Comment