

How To Make A Rock Garden Animal Crossing

How to make a rock garden in Beast Crossing: New Horizons
Learn how to motion your rocks to a rock garden for easy gathering in Animal Crossing: New Horizons.
Making a stone garden in Animal Crossing: New Horizons can exist extremely useful for a few dissimilar reasons. Non only does it get your rocks out of any areas you programme on developing in, but information technology besides makes it very easy to harvest all of your daily materials in 1 brutal swoop. Unfortunately, though, getting your stone garden ready is going to exist a bit slow. We've broken down the entire procedure in the guide below, so continue reading if you want to know how to make a stone garden in Brute Crossing: New Horizons.
How to brand a rock garden
If you're going to set a rock garden, then yous're going to need to prepare a few things. Outset, nosotros're going to outline the items y'all need to make this work. Here'south a listing of all the items you need to build a stone garden:
- 6 fruit
- A shovel
- A 7x5 grid area (or 7x9 if you want to fence in the garden) situated across two regions of the map
- Terraforming unlocked
- A simple blueprint in your Custom Designs app that you can easily edit afterwards.
Now, before we get started, I remember it'southward of import to signal out just how slow this entire procedure is. The method that we're going to suggest is the easiest to make clean upward, but it will leave you with hundreds of mannequins all around your island. This makes information technology hard to navigate, and even disrupts the spawning of things like coin spots (the shiny holes that you tin use to abound money copse). As such, you should seriously consider whether this is something you want before you set out to exercise information technology. If you're sure y'all want to invest the fourth dimension – and possible Bong loss – then you can continue using the methods nosotros've outlined beneath.
Setting upwardly your filigree
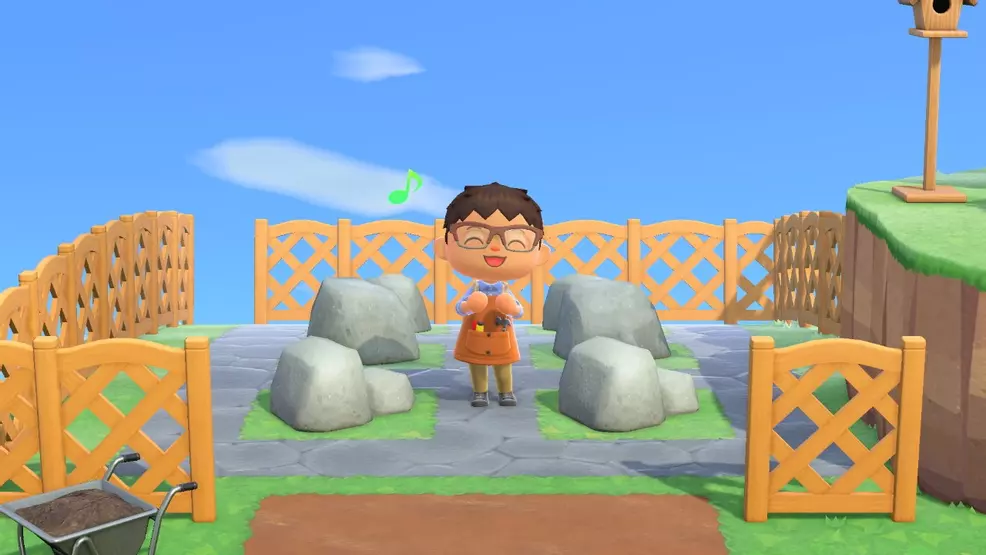
The beginning thing you need to do before you lot first throwing downward mannequins everywhere is set upwards a grid for your rock garden. As I mentioned in a higher place, y'all're going to want a 7x5 grid surface area, or a 7x9 grid surface area if you plan to fence it. I highly recommend fencing the area in, as it allows y'all to hit all of your rocks for the total eight times without having to worry almost earthworks holes.

You'll also demand to brand sure y'all discover the perfect place for your grid, equally there are some rules that rocks have to follow when respawning. Showtime, you can simply have a total of four rocks in any i region of the map. If you lot open your map, you'll notice that information technology'due south broken downwardly into grid-like pieces. These are all unlike regions of your map. Because of this dominion, you'll want to set your grid up on the line that separates two regions.
Rocks can announced in dirt, dark clay, and sand path tiles. Use rock, wood, or any other hard path to draw out the filigree for your garden.
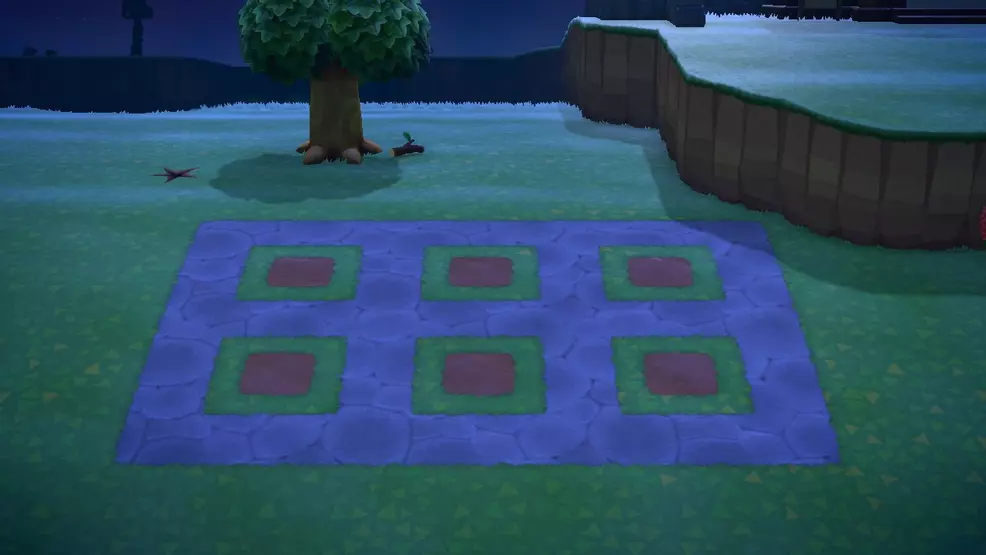
You tin either set the garden up forth the vertical lines – similar to how I set mine up in the image above – or you tin ready information technology up horizontally. Find a place that works well for yous (one that y'all're happy keeping for a while, as this process is wearisome) and and so use a difficult path like stone or wood to chart it out. Make sure to exit open up spots (or put down dirt or sand) for the rocks. Y'all'll want the final product to wait similar this before you start breaking rocks.
Move your rocks
Now that you accept the basis for your rock garden ready, you can actually outset moving your rocks around. This is where the shovel and fruit come in handy. Go ahead and eat all 6 pieces of fruit and so brand your way effectually your island. Detect all six of your rocks and destroy them. Brand certain you've already gathered upwards all your materials for that day, equally information technology will have a few days for the rocks to respawn in your garden. Alternatively, you tin can besides intermission up the rocks i a day, as this will allow you to proceed gathering some materials while you wait for them to all respawn in the garden area.
We briefly covered the topic of moving rocks in another guide on the site, and so make sure to cheque that out if you have any other questions almost this part of the process.
Blocking off future rock spawns
There are a few different methods available for this process, notwithstanding, for the sake of an easy cleanup, we're only going to focus on the mannequin method. If you want, you can always check out the Animal Crossing subreddit or various YouTube videos for details on other methods. While boring, this method offers the easiest cleanup possible, so we suggest using it if you plan on making a rock garden.
Before you become started blocking off futurity spawns, there are a couple of things to note. Rocks cannot spawn in the post-obit areas:
- On the beach
- Adjacent to existing buildings/houses
- Touching the border of a river/swimming
- Correct next to a tree
- On the edge of a cliff (any layer)
- On any hard paths like stone, wood, or brick
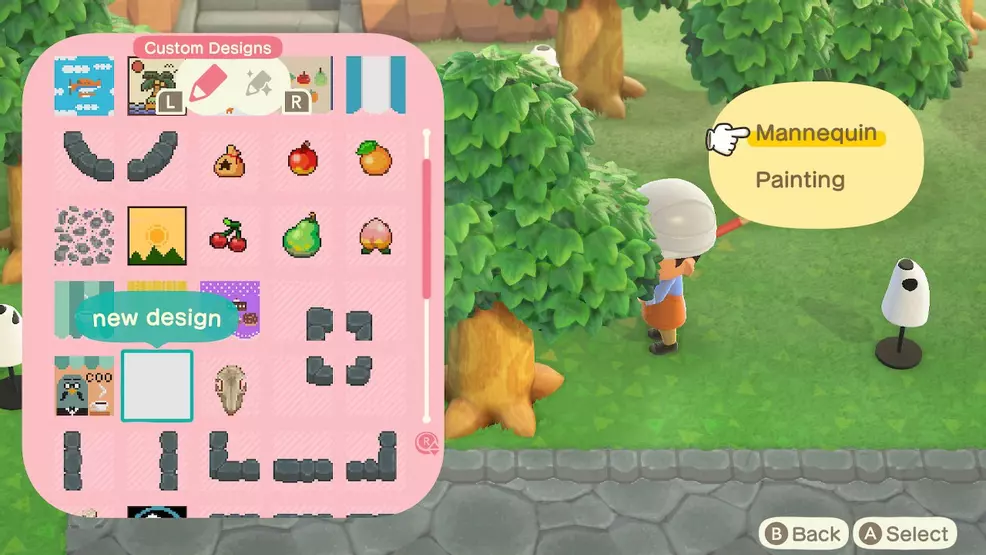
With this in heed, you can starting time setting upward your mannequins to block any future spawns to ensure that the rocks spawn in your garden when they reappear. You can use any pattern that you've made, just I suggest using something that you tin can hands edit when yous're done. When I did it, I simply used a blank white design that I didn't care about.
When you're ready, caput to one side of your island and start dropping mannequins. Rocks need to have eight blocks around them in order to spawn. Flowers and weeds count as empty spaces when it comes to stone spawns, so brand sure yous place mannequins next to them to keep rocks from spawning. I made the error of not blocking off the surface area shut enough to a grouping of flowers and ended up with a rock with flowers all effectually it.
To successfully cake off the futurity spawns, make sure you're placing down a mannequin every ii blocks (you tin can check this by earthworks holes with your shovel). This will continue the rocks from being able to spawn in the complimentary area and give y'all plenty of room to movement around. Now, obviously you aren't going to be able to set this upwardly perfectly, as yous will need to work around buildings, paths, and other obstacles. Just do your all-time, and make sure that any possible areas that rocks could spawn are covered with mannequins.
If you do, for some reason, miss a spot, you can always break the rock that spawns and just drop some other mannequin down. Once yous've finished placing down mannequins, I highly recommend taking a trek effectually your map. Brand sure you tin can still get around easily plenty, and that you didn't miss any possible spawn locations. If – like me – you're paranoid of an area that shouldn't have a spawn, you lot can always set up another mannequin. What's 1 more out of ii hundred, right?
Cleaning upwardly after
At present, all you can practice is wait. If yous're not a time traveler, so just continue doing your daily tasks equally y'all tin. Why not take a look at more of our Brute Crossing: New Horizons guide for more than helpful info most other tasks you tin accomplish in Nintendo's latest hit. If you are a time traveler, then go ahead and bound forward to the side by side day and bank check things out.
If rocks are spawning correctly in your garden, then you're skilful to go. Just exit your mannequins upwardly until all vi have moved to the garden. If you aren't seeing any rocks spawning in the grid that yous set up, then become ahead and make a laissez passer of your isle and await out for any possible rocks. If whatever spawned in areas you lot didn't want them to, then go ahead and break them using fruit and a shovel.
Ate too much fruit? Check out our guide on how to get rid of the food buff.
Go along this method until all six of your rocks take spawned in your garden. When all 6 are situated correctly, caput into your Custom Pattern App on your Nook Telephone and then find the design that you used to set up your mannequins. Open it upwards in the designer, and so change i role of it. This can be equally simple every bit placing a red dot on it or annihilation similar that. This change volition cause the mannequins that you lot placed around your island to vanish, making cleanup for this process super simple.
Now that you've completed the process and moved your rocks to a rock garden, you can start gathering your daily materials much more than hands.

Source: https://www.shacknews.com/article/118011/how-to-make-a-rock-garden-in-animal-crossing-new-horizons
Posted by: mclachlanlaze1999.blogspot.com
0 Response to "How To Make A Rock Garden Animal Crossing"
Post a Comment